For the game’s main menu, we are planning on having a 3D sign made up of multiple parts (one which will have the name of the game, maybe an address or date, and one part which will function as the “play” button), made to resemble old shop signs that hang above high street shops. In order to add more atmosphere and motion, we will create chains in Unity that hold the pieces together so that the sign can “swing” more realistically.
Sign Sketches:

Once again, we plan to create a low poly model, so we may need to simplify some aspects and work with more basic forms. We decided we like the look of the second design (right) more and also think this will be easier to model because it has more straight edges.
Sculpting sign in Blender:

Now I want to add this sign into the game as our main menu. The idea is that the top part will be textured to feature the name of the game (as if it is the shop name), and the smaller sign underneath (a “now open” sign) will act as the play button.
Creating Main Menu:

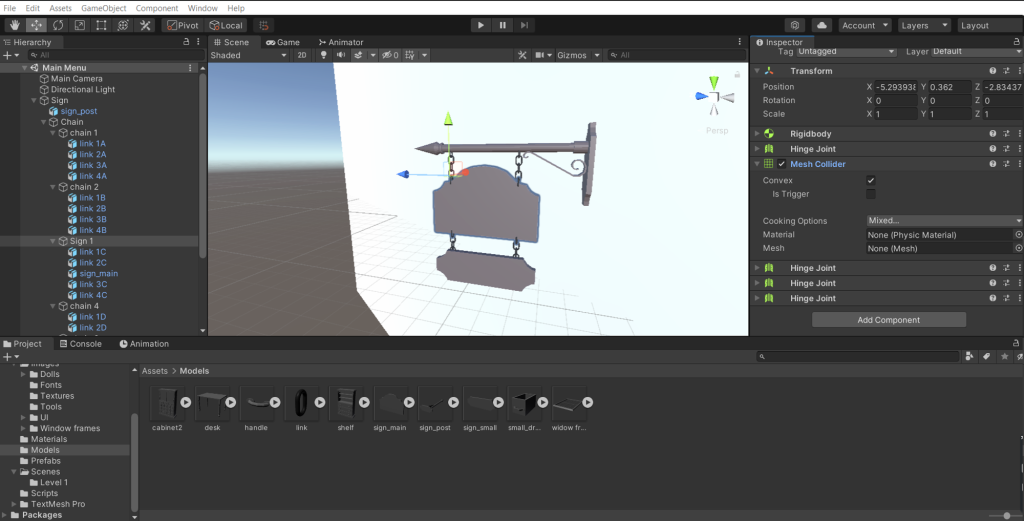
I started by creating a new scene into which I imported my 3D model for the sign in 3 parts (the post, the main sign and the smaller sign), with their temporary textures. I also made a chain link in Blender and imported that, to which I then attached a rigid body, a hinge joint, and a mesh collider.
By duplicating the link object I could create a chain that would have a degree of realistic physics to it, I just needed to make sure each hinge connected to the rigid body of the link before it. There are also some other settings such as isKinisthetic and isConvex that will be different for specifically the first link in the chain only.
It did become slightly more tricky when it came to attaching the sign parts, as they then had multiple hinges and this sometimes caused the physics and hinges to have issues, breaking or not connecting properly. I named the links using a letter/number system so that I could more easily identify and check which ones where connected and where, and after double checking the positioning of each hinge I got the desired effect:
Adding UI as a world space element:
We start by adding a UI canvas to our main menu scene, and instead of the default screenspace, we use the “world space” render mode. and assign our main camera to it.
The canvas is very big, so we we shrink it down the scale to get it to fit properly within the size of our scene.
For now we only need one button, a “play” button, and we want it as text on the small sign that is going to move with it, so I simply make the canvas a child of the sign object. then I add a textMeshPro button to the canvas (because it is higher quality and has more options than a regular button), and test to make sure it works by making the text highlight colour different:
With this, the main menu is nearly done, we just need to add some textures, lighting, and maybe some creepy music, and script the button to load the level 1 scene.
Finished Version:
Added in textures, changed font, added post-processing effects and materials.
I’m personally quite happy with this, I think it is fun way to present the main menu of our game and stays on theme of trying to have UI that is diegetic or meta where possible.
I think the physics for the sign swinging could be improved to make it look more realistic, having it swing from a force applied more towards the bottom of the sign, but I am unsure what settings I would need to change to achieve this effect, and I think it serves its purpose well enough as it is now.
Laura Alford
