Hello! Welcome to my first in-depth post about the development of our game.
I’d like to preface this by stating that I am still relatively new to game programming and using Unity, having about 2.5 years of experience with Unity and 4 years of programming in C#, so I still have much to learn about game development.
Through this devlog, I will be documenting most of my key learning experiences along with the main technical challenges faced and my solutions to them (which obviously may not be the best solutions). However, I hope this will give further insight into the inner workings of the game (and our design process), and can maybe even be used as a resource to help others working on similar games.
More details about the direction of the game…
As we mentioned in our introduction, Morbid Curiosities is, in essence, a Gothic Horror take on online flash make-over games, themed around Victorian dolls.
As a point-and-click game, the core mechanics involve clicking on/dragging and dropping objects around the screen. We picked this type of gameplay because it’s obviously very reminiscent of the aforementioned online flash games, but also because we believe using the mouse for interactions is a simple but effective way of capturing different hand movements. Our intention is that this will create a stronger tie between the player and their actions within the game, which will help the experience feel more immersive and impactful.
The game itself is intended to be entirely linear, with no particular fail or win states (other than playing the game to its completion). We are aware that this can be risky, as there is only one goal for the player (to complete all the tasks in each level of the game) and no real threat to the player that can prevent them from achieving this. This could result in the game feeling very restrictive, and could even make it boring. However, there are plenty of examples of very linear games that still succeed in being engaging interactive experiences, and this is what we are aiming to achieve.

Our current plan for the game features 3 levels in total, with level 1 being the longest and acting as a tutorial of sorts that will allow the player to become familiar with all the mechanics and core features of the game. We often describe our game as being made up of smaller sequences (or segments), which means we have some room to either add to or cut down on the scope of our project by adjusting the length of each level (as well as the number of levels) depending on circumstances.
Prototyping
During the initial idea phase of the project, we created a quick paper prototype as a visual reference and to practice/demonstrate the core aspects of the game.
Later, I created a very simple 2D prototype in Unity to test how our mechanics, object layouts, UI, intended camera angles and general feel of the gameplay would translate into the point-and-click game we visualised. This also gave me the chance to start scripting some of the basic code that will be needed for the game’s main functions, try out different methods for implementing these features, and note any possible issues or information that would help me to approach setting up the game.
By making this prototype, I was able to better prepare myself for working on the actual game. I decided that it would be useful to start by looking at tutorials for creating a 3D environment point-and-click game (even if our game will mostly be 2D). This way, we should have more flexibility with the scene staging and can try out different camera angles and lighting setups.
Most of the code from the prototype should be relatively easy to adapt for a 3D game, and means we already have a start on the scripts needed to implement some of our core interactions. One thing that I will aim to change is how picking up items works; in this prototype, when an object is clicked the object is hidden and the player’s cursor is changed to the object’s sprite image. I think it might be better to actually have the object follow the cursor around, and the cursor hidden instead, as Unity warns against having cursor images bigger than 32×32.
Beginning development of the game (Level 1)
To start with, I set up a basic 3D scene in Unity, and essentially focused on recreating the earlier prototype, making the changes outlined above. Although we are still using a top-down perspective and 2D view, this version of the game uses a 3D model for the table, and is set in a “room” with a floor and walls.
Following a tutorial for a 3D environment 2D point-and-click game, I created a basic room structure with a floor and 4 walls. Then I added the table, cube and sphere objects, following the tutorial’s advice of having each one contained within an empty parent object set to 0,0,0.

On the table I set up some temporary objects that will eventually become our doll. I also set up the main camera to have the top down view that we want to have for our game.

The navigation in this scene is created by setting up a network of nodes, with props and locations, all with different camera positions. For our game, we will have 2 main locations, the table (workspace area) and a shelf area. In these locations we may have various “props”, like the doll or the shelf drawers, which will all have their own camera positions.
I then set up some basic UI buttons and a UI script that will allow us to move back and forth between our 2 locations.
To make this set-up match the view needed for our game, I remove the blue cube (as it is not needed), and start adding features from our 2D prototype such as the selectedItem and closeUp global variables.
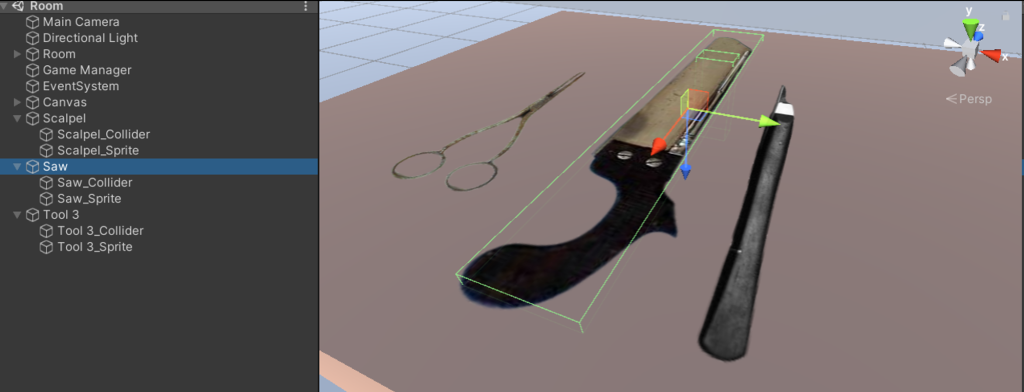
Following the same method for creating 3D objects, I have the main box collider for the whole object as a component on the parent game object, then a child object for the 2D sprite (the equivalent of the model) and another child object collider that I might use for collision detection between the objects (although I might replace these and use rays instead).
I then recreate my itemClick script from the prototype and set it to work with the objects in the scene.
This sets ups some of the core basics of our game, and we can now continue to adapt and shape this into the game we want to make.
Next, we created a rough storyboard for our first level:

Whilst we do have some cinematics and a main menu planned for the game (which will come before starting the first level), we are going straight to working on the gameplay portion of level 1 because we are eager to test and get feedback on this.
We are now in a good position to immediately start making both the 3D and 2D assets we want to use in our level, and can start adding them and other placeholders into the game asap.
That covers the key points of our progress so far, and how we got started on our game. There’s still a lot to do, so in order to manage our time we’re using a weekly sprint structure with several check-ins throughout the week.
Laura Alford